
Posted by Tristate on 23rd Apr 2026
Tech Tips - Door Closers
We have all been there. You walk into a hotel room, a mom and pop store, or one of the big box stores. You pull open that front door and the door feels like you’re trying to move a boulder or like the location was waiting for your arrival and the door wanted to move out of your way as you entered. Once you walk through the threshold the door tries to take its revenge by swinging closed with purpose to push you into location or it floats lightly back to close without a care.
Why does this happen? Poorly maintained, misunderstood, or improperly installed door controls. More specifically an automatic closer, typically referred to as just…a closer.
First, let’s look at the anatomy of a closer using broad terms so you can get back to work. The picture below uses an LCN 4040XP as an example. Trust me, there are many other variants offered by LCN and many other manufacturers of closers with their own design. This may not look like what you have in front of you, but all closers adjust very similarly.
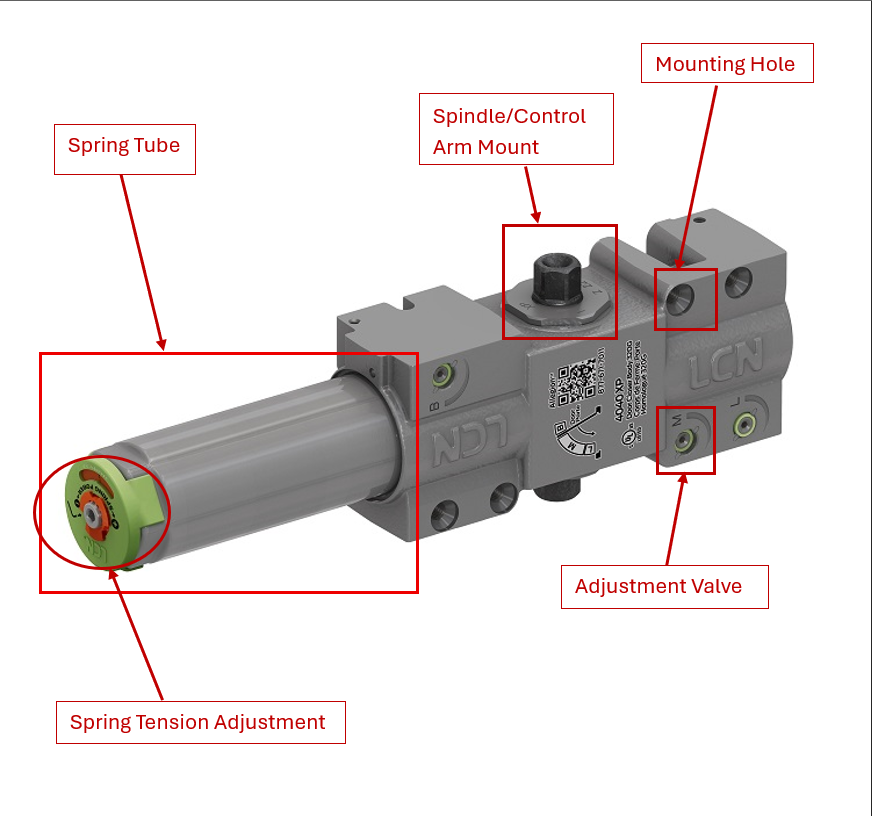
- Spring Tube – This can be external like in the picture, or it may be in the closer body itself. This houses the spring that closes the door.
- Spring Tension Adjustment – Arguably, the most important of all the adjustments. This can be a hex head, allen wrench, or flat head style adjustment. Adjusting this increases or decreases the force or power the closer outputs to close the door. (WATCH OUT! Messing with this in areas that are ADA compliant could get you in trouble) This adjustment causes the door to feel like a feather or to feel like a solid brick wall when you open it.
- Spindle/Control Arm Mount – This is the place that you mount the armature to. The armature is not pictured as there are many forms. Push Arm, Pull Arm, slide track, conceal arm to name a few.
- Mounting hole – No matter what closer you have; it must mount to something. LOOK OUT! There are numerous ways that manufacturers have designed their closers to mount. Keep an eye out that you do not loosen the wrong fasteners otherwise a concealed closer could come falling out of the frame!
- Adjustment Valve – Arguably, the contender for the most important adjustment. Most entry level closers or “white box” closers will only have two valve adjustments (speed and latch). Your higher end closer could have 4! The valves increase or decrease pressure within their compartments to cause the door to move faster or slower at certain parts of the swing. The most common things these adjust are:
- Swing or Sweep Speeds
- Latch Check Speed
- Back Check
- Delay Speed
WARNING: DO NOT OVERTIGHTEN OR LOOSEN THE VALVES. IT WILL CAUSE YOUR CLOSER TO LOSE PRESSURE AND RENDER IT USELESS.
Okay, so now you know the important things. Let’s breeze over the common adjustment for what you are seeing:
- Door moves with purpose closed (from full open to close in about 2-3 seconds) – You need to adjust the swing/sweep speed clockwise (commonly marks as “S” on the body). We are looking for about 5 seconds to close, in most cases. The opposite would be true if your door takes 7-8 seconds to close. We would want to adjust counterclockwise to speed up.
- This next one could be partnered with #1 as well. Door comes 80 percent closed then without warning slams shut. Or door is coming close and at 80 percent slows to a turtle’s pace to full close (2+ seconds). We need to adjust Latch Speed (Commonly “L” on the closer body). To slow the latch speed down we turn clockwise and counterclockwise to speed up.
- Your door opens towards a wall to which you have repaired the drywall many times. You need to utilize the Backcheck valve (Typically “B” on the closer and is hanging out by itself somewhere opposite of the swing and latch valves). Doing a clockwise turn on this would cause a “pressure” to be felt when the door is nearing full open (90-120 degree’s depending). This acts like a deterrent to tell pedestrians to stop pushing and it is like a cushion for particularly aggressive users who want to Heman the door open because the location did not have their particular olive oil in stock. Pair this with a floor or wall stop and those repairs should minimize.
- The door feels like a feather or a brick wall when opening the door. This is the spring tension. If you have ever pulled a door open that does not have a closer on it (any residential door) it should not be anything difficult to move. Most customers usually complain “the new door they installed is so much heavier than our old one”. No, it isn’t. The spring tension was not adjusted at the time of installation. Now this article is not here to tell you exactly what tension you need. This is VERY dependent on the environment that you are working in and there are always considerations to take into account when adjusting spring tension. A few are, ADA Compliance, stack pressure, the typical weather you have in your area, is the door exterior or interior, are you in high security or a retail area. If you have concerns about any of the adjustments on your closer, stop and call a professional in the industry.
Okay, so you have messed around with your closer for what seems like an hour or days. For some reason, it wants to slam shut with a vengeance no matter what you do to the valves or spring adjustments. The closing speed adjusts but doesn’t last to full close and your latch speed is non-existent. In fact, it looks like there is no force holding the door shut when it is closed! Your closer probably does not have pre-load.
Now, not all closers require preload, but almost all SURFACE MOUNTED closers do. We will do another article on the types of closers later. Surface mounted closers are the most common. If you can see it, it’s a surface mounted closer.
Pre-load – If you want your closer to function right and bring that door closed and get that positive latch sound everyone looks for, then you have to apply pre-load to the closer. This is simply an initial amount of spring tension applied to the armature when the door is at full closed. An easy way to think about; your closer is continuing to close the door AFTER it has shut all the way. This applies positive tension to the door to keep it shut.
YOU DID IT! YOUR DOOR WORKS GREAT!...No? It doesn’t?
Okay, so you have done all these proper adjustments and that door is screaming closed still. It does a little bounce back open before resting at closed or near to closed. Or the door has changed occupations and is now part of a demolition crew which is wreaking havoc to your door jamb, trying to free it from its purchase. If you see what looks like drippings down the face of your door and they are coming from the closer, there is your explanation. When a closer reaches the end of its life you will often see this on site. The valve gaskets lose pressure and now your door has unchecked spring pressure closing it. This can be a slow process where the hydraulic fluid in the closer body is slowly releasing and it often affects the swing/sweep speed first and then moves to the latch speed. Either way, you now need a new closer or need to have a professional repair the closer you have. Nowadays the former is the easier option.
We hope that this opinion article helps you to determine either repair or replacement of your equipment. If you are in the Maintenance, Repair, and Operations field and need repair parts or new equipment, consider Becoming A Customer. We will assist you in finding the parts you need and get them to you in a timely manner. Check out our catalog for the closers we offer and if you don’t see the one you need ask us for a quote and we will find the closer you need. Share this article with your co-workers so we can help ensure that our doors function safely and properly for the pedestrians who use them.
What other doors can we help you open today?